Roof Replacement Tools - Complete Installation Equipment
Complete roof replacement demands tools that perform consistently for days in Gwinnett County's demanding conditions. From tear-off shovels that strip old shingles efficiently to pneumatic nailers that drive thousands of fasteners at perfect depth, these professional-grade tools handle the sustained heavy-duty work that full roof replacement requires. Whether you're a contractor outfitting a crew near Suwanee Town Center or a capable homeowner tackling a garage project along Peachtree Industrial, these are the tools that deliver professional results.

🔨 Tear-Off & Removal Tools
The tear-off phase determines how smoothly the rest of your replacement goes. Specialized roofing shovels get under shingles and lift them in large sections rather than scraping piece by piece. Heavy-duty pry bars handle stubborn nails and tight areas. Magnetic sweepers collect dangerous loose nails from work areas. Proper tear-off tools protect the roof deck for clean new installation.
| Picture | Product | Type | Key Features | Shop |
|---|---|---|---|---|
 |
Roof Tear-Off Shovel | Removal | Serrated edge, D-grip handle, Fulcrum design | Buy on Amazon |
 |
Heavy Duty Pry Bar Set | Prying | Multiple sizes, Hardened steel, Nail pulling | Buy on Amazon |
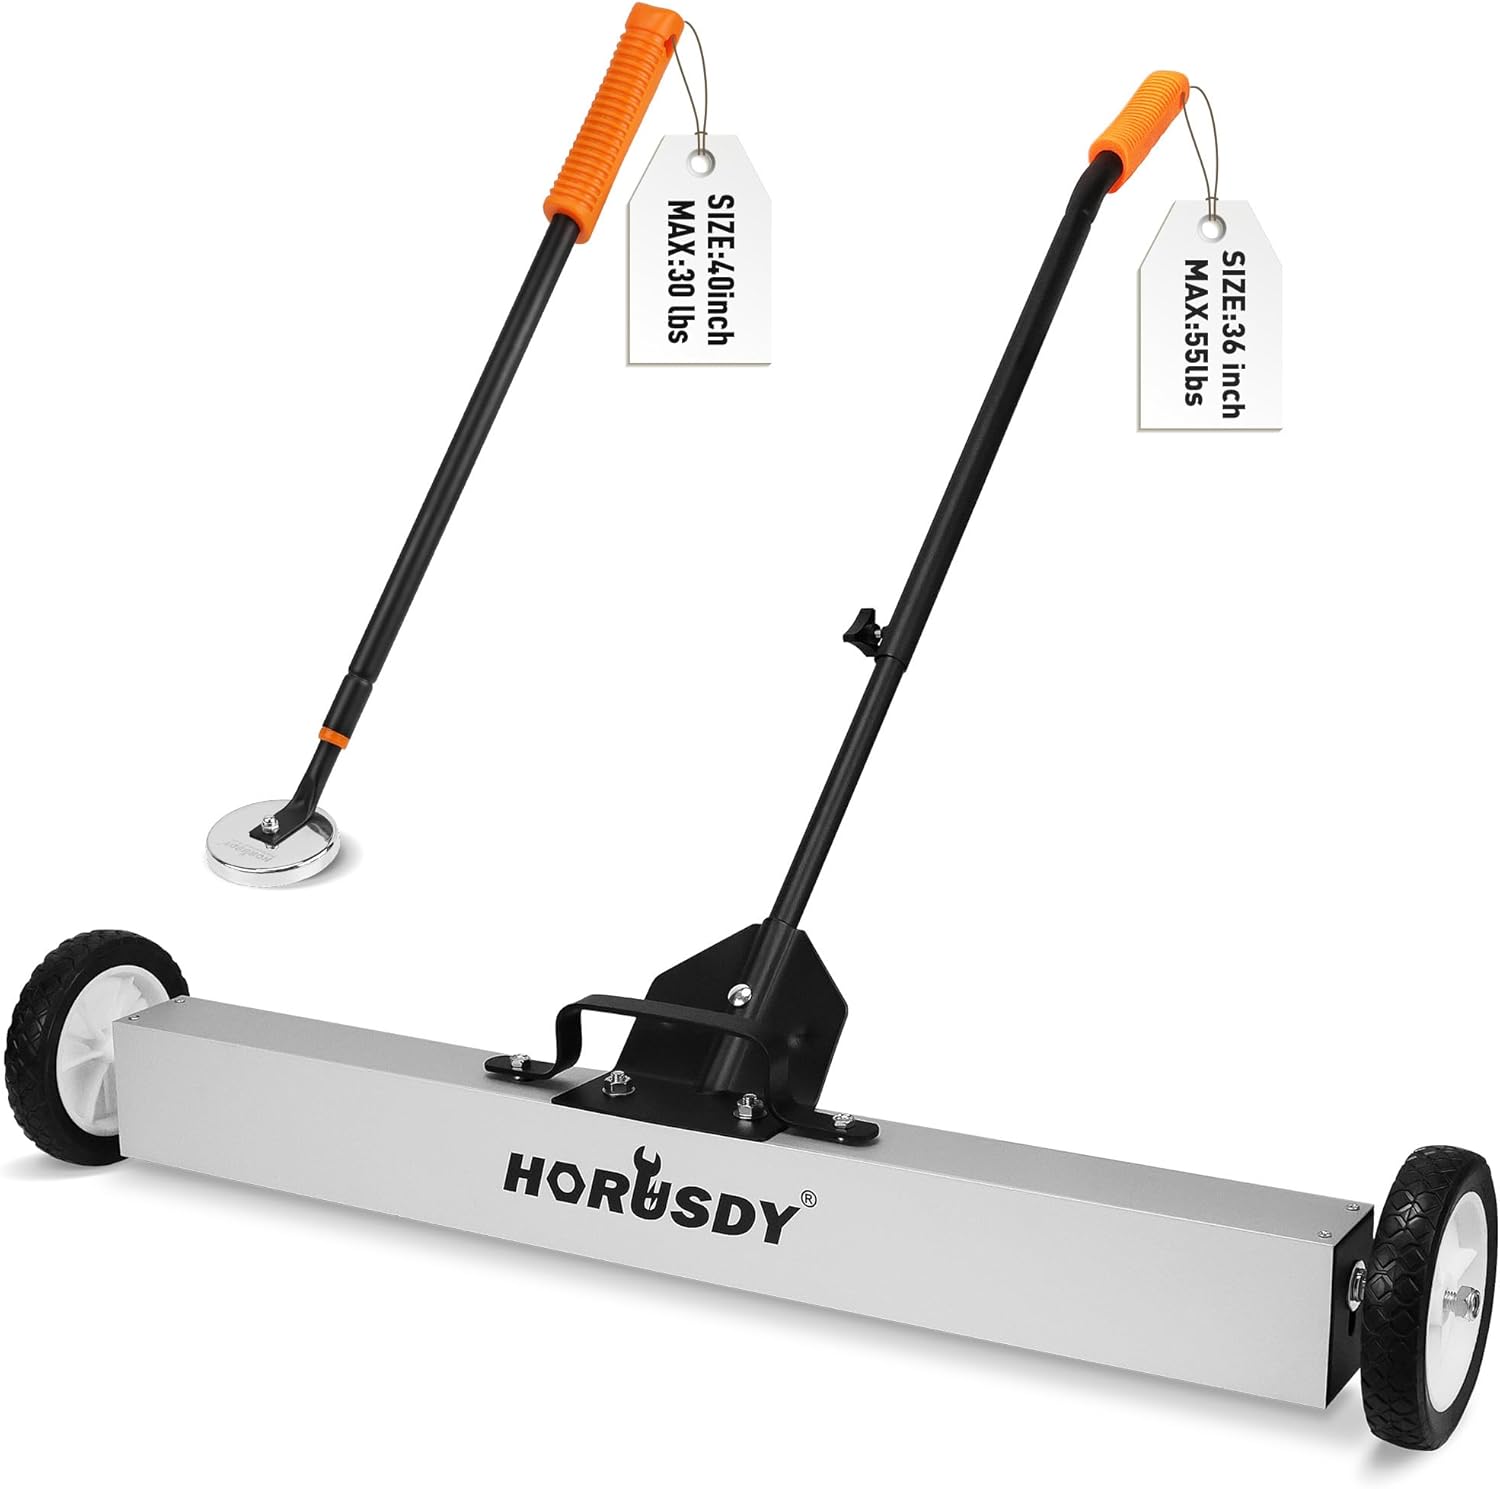 |
Rolling Magnetic Sweeper | Cleanup | 24" width, Release lever, Nail collection | Buy on Amazon |
 |
Roof Debris Chute | Disposal | Connects multiple sections, Directs to dumpster | Buy on Amazon |
💡 Pro Tip: Start tear-off at the ridge and work downward in manageable sections. Check roof decking for damage as you expose it - soft or damaged areas need replacement before new installation.
Browse All: Tear-Off Tools on Amazon
🔫 Nailers, Compressors & Installation Tools
Installing thousands of shingles requires tools that handle sustained volume with consistent performance. Coil roofing nailers drive fasteners at proper depth without overdriving or underdriving. Portable compressors provide reliable air pressure throughout long installation days. Chalk lines ensure straight courses, and speed squares handle precise angle cuts around penetrations.
| Picture | Product | Type | Key Features | Shop |
|---|---|---|---|---|
 |
Bostitch Coil Roofing Nailer | Pneumatic | 120-nail magazine, Adjustable depth, Lightweight | Buy on Amazon |
 |
Portable Air Compressor | Power | 6-gallon, Oil-free, Quick recovery | Buy on Amazon |
 |
Chalk Line Reel | Layout | 100ft line, Refillable chalk, Straight courses | Buy on Amazon |
💡 Pro Tip: Test your nailer's depth on scrap material before starting. Nails should be flush with the shingle surface - overdriving tears through shingles, underdriving leaves nails exposed to wind uplift.
Browse All: Roofing Nailers on Amazon
⛑️ Safety Systems for Extended Roof Work
Roof replacement involves days of work on elevated, sloped surfaces where fall protection isn't optional. OSHA-compliant harnesses, permanent roof anchors, and non-slip footwear are essential for sustained safety. For multi-day projects in Suwanee's summer heat, add cooling equipment and hydration systems to prevent heat-related emergencies.
| Picture | Product | Type | Key Features | Shop |
|---|---|---|---|---|
 |
Complete Roofing Harness Kit | Fall Protection | Harness, lanyard, anchor, OSHA compliant | Buy on Amazon |
 |
Cougar Paws Roofing Shoes | Footwear | Replaceable pads, Extreme grip, Steep pitch | Buy on Amazon |
 |
Adjustable Roof Jacks | Work Platform | Adjustable pitch, Holds scaffold plank, Steel | Buy on Amazon |
 |
Evaporative Cooling Vest | Heat Protection | Stays cool for hours, Lightweight, Reusable | Buy on Amazon |
💡 Safety First: Never work on a wet roof. In Suwanee's summer heat, start early and stop before peak temperatures - roof surface temps can exceed 150°F by midday.
Browse All: Roofing Safety Equipment on Amazon
📐 Measuring, Cutting & Layout
Accurate measurements and clean cuts separate professional installations from amateur work. Speed squares mark precise angles for cuts around penetrations. Roofing utility knives with hook blades cut shingles cleanly. Tin snips handle flashing and drip edge. Proper layout with chalk lines ensures straight shingle courses that look professional and shed water correctly.
| Picture | Product | Type | Key Features | Shop |
|---|---|---|---|---|
 |
Roofing Utility Knife | Cutting | Hook blade, Quick change, Clean cuts | Buy on Amazon |
 |
Rafter Speed Square | Layout | Angle finder, Cut guide, Aluminum | Buy on Amazon |
 |
Aviation Tin Snips Set | Metal Cutting | Left, right, straight, Color coded | Buy on Amazon |
Browse All: Roofing Layout Tools on Amazon
🧰 Underlayment & Flashing Materials
Proper underlayment and flashing provide the backup weather protection that keeps your home dry even if shingles are compromised. Synthetic underlayment outperforms felt paper in durability and slip resistance. Ice and water shield seals vulnerable areas like valleys and eaves. Step flashing and drip edge complete the water management system.
| Picture | Product | Type | Key Features | Shop |
|---|---|---|---|---|
 |
Synthetic Roof Underlayment | Barrier | Tear-resistant, Non-slip, UV stable | Buy on Amazon |
 |
Ice & Water Shield | Waterproof | Self-sealing, Membrane, Valleys/eaves | Buy on Amazon |
 |
Drip Edge Flashing | Water Management | Directs runoff, Protects fascia, Standard sizes | Buy on Amazon |
💡 Pro Tip: Install synthetic underlayment from bottom to top with minimum 4-inch overlap. In Gwinnett County, apply ice and water shield at least 36 inches up from eaves to protect against ice dam backups during rare winter freezes.
Browse All: Roofing Materials on Amazon
❓ Frequently Asked Questions - Roof Replacement
Professional Roof Replacement Solutions
Planning a roof replacement project? Browse our recommended professional-grade tear-off tools, nailers, compressors, and safety equipment.